Welcome to Zeemium Industries
Installation Guide!

Our high-quality color-coated roofing sheets are designed to offer durability, aesthetic appeal, and superior protection. Follow these instructions to ensure a safe and efficient installation.

Groove Section Positioning

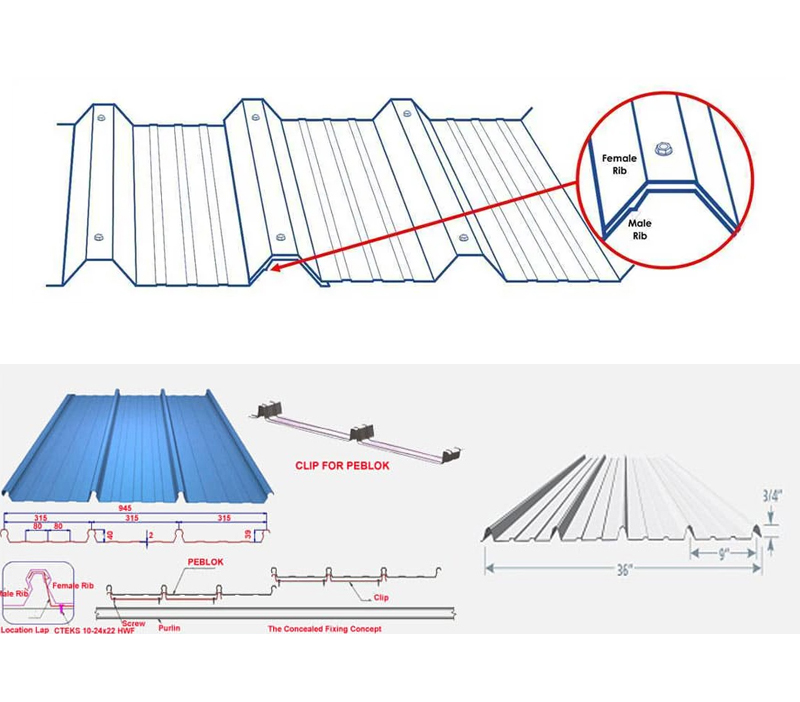
The positioning of grooves in color-coated roofing sheets plays a crucial role in ensuring proper water drainage and structural stability. Here’s how grooves should be positioned and handled during installation:

  • 1. Groove Alignment When installing sheets, ensure the grooves of adjacent sheets overlap correctly. This prevents water seepage during rains and provides a seamless look.
  • 2. Groove Orientation Position of the grooves should be in such a way that they run from the high point of the roof towards the gutter or drainage area at the lower end. This ensures smooth water flow without pooling.
  • 3. Groove Depth Deeper grooves are better for the regions with heavy rainfall as they provide better water drainage.
  • 4. Handling & Safety While handling the sheets, lift them from the sides rather than dragging them, as grooves are prone to scratches.

Steps of Installation

  • 1. Measure and Mark
    1. Accurately measure the length and width of the roof to determine how many sheets are required.
    2. Use chalk lines or laser levels to mark the positions for the sheets on the roof frame.
  • 2. Cutting the Sheets (if required)
    1. Use a metal cutting saw or shears to trim the sheets to the required size. Ensure the cuts are clean and smooth to avoid any damage to the coating.
    2. Apply edge protectants if needed to ensure the cuts do not corrode over time.
  • 3. Placing the First Sheet
    1. Begin installing the first sheet at the edge of the roof (usually the eaves side). Ensure it is level and aligned with the markings.
    2. The sheets should overlap by a specific amount (typically 150-200 mm) to prevent water leakage. The overlap ensures that rainwater flows off the sheets without seeping through the joints.
  • 4. Fixing the Sheets
    1. Secure the sheet to the roof structure using the recommended fasteners (e.g., screws with rubber washers or self-drilling screws).
    2. Tighten the fasteners securely but avoid overtightening, as this could damage the sheets or strip the threads.
  • 5. Installing Subsequent Sheets
    1. Place the next sheet in line with the first, ensuring the overlap is consistent. Sheets should be aligned properly to avoid any misalignment.
    2. Repeat the fastening process for the subsequent sheets and continue this process until you reach the top of the roof.
  • 6. Sealing and Waterproofing
    1. Apply a suitable sealant along the joints between the sheets and where the sheets overlap to ensure a watertight seal. This will prevent water from seeping through and causing rust or leakage.
    2. If necessary, install gutters and downspouts to channel water away from the roof and prevent accumulation.
  • 7. Final Inspection
    1. Once installation is complete, conduct a water test by spraying or simulating rainfall to ensure the roof is watertight.
    2. Examine the roof for any visible damage to the color-coated sheets, such as dents, scratches, or rust.
  • 8. Cleaning Up
    1. Clean the roof area of any construction debris, scrap materials, and tools to leave the site tidy.
    2. Ensure that all tools and equipment are properly stored or removed from the work site.
  • 9. Maintenance Tips
    1. Clean sheets regularly to remove debris.
    2. Inspect the sheets for rust or damage annually.
    3. Avoid walking directly on sheets instead use a support plank
  • Long Term Durability*

  • High Security*

  • Better Protection*

  • Quality*